
How to Manage Billing
| Update Payment Method |
| Change Default Payment Method |
| Delete Payment Method |
| Update Billing Information |
| Access Invoice History |
| Update Subscription |
| Cancel Subscription |
Select the Settings button.
Alternatively, you can click the profile picture in the upper right-hand corner of the screen and select Profile Settings.
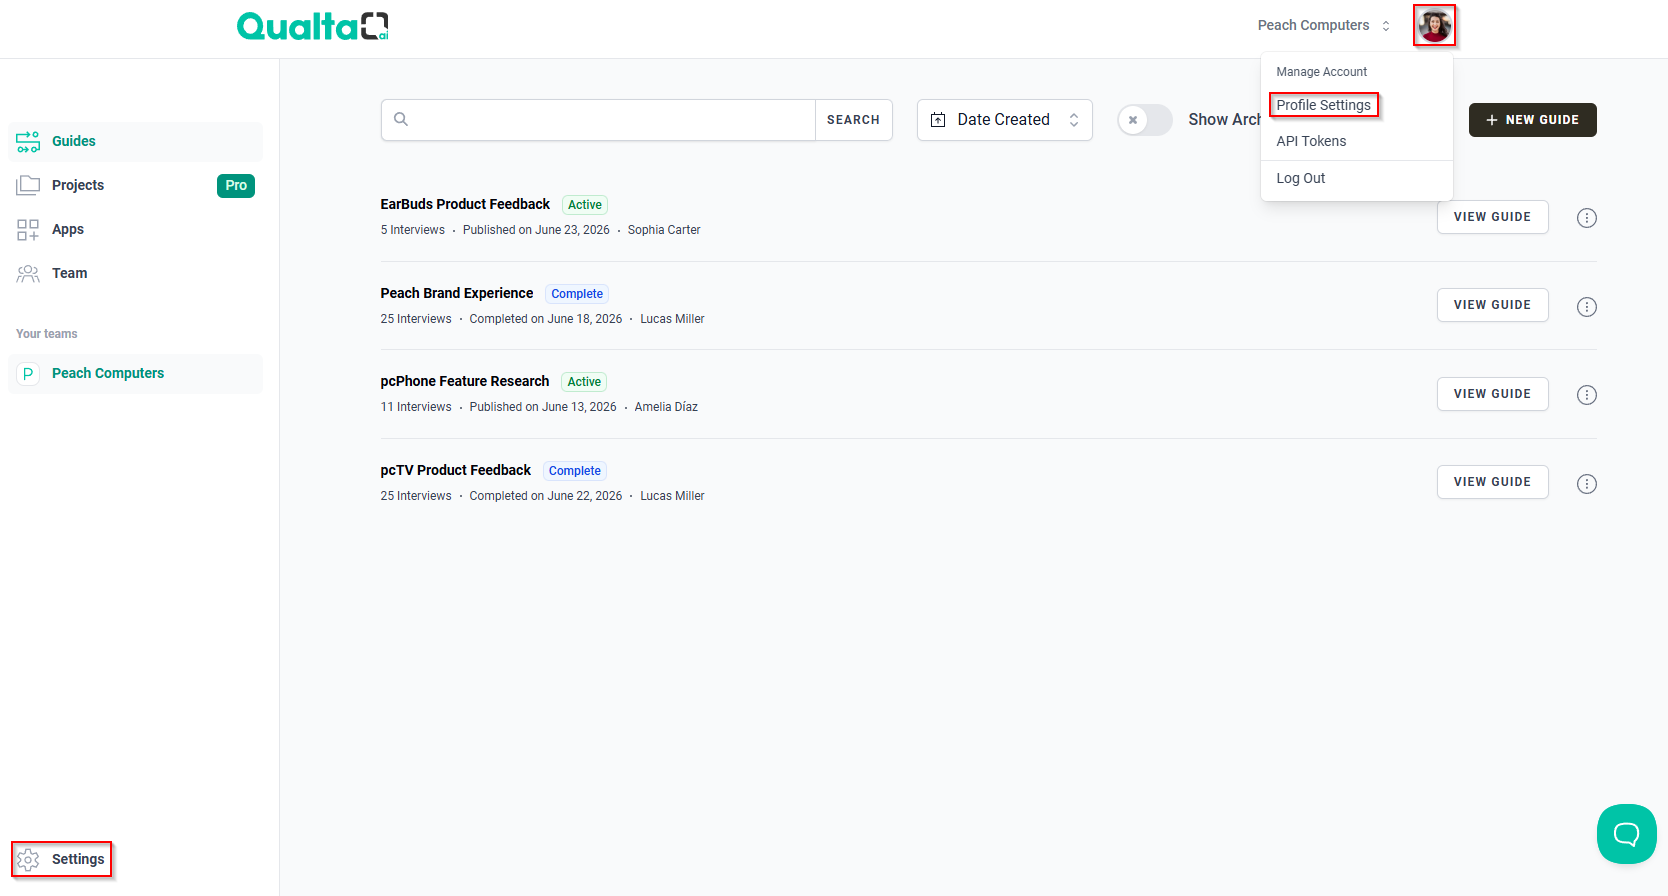
Both of these methods will take you to the Profile Settings page.
In the Profile Settings page, scroll down to the Billing section and select VISIT BILLING PORTAL to open the Billing Portal page.

Update Payment Method
In the Billing Portal page, under the Payment Methods section, select the + Add payment method button.

This will take you to the Add payment method page, where you can choose to add a card or a U.S. bank account.
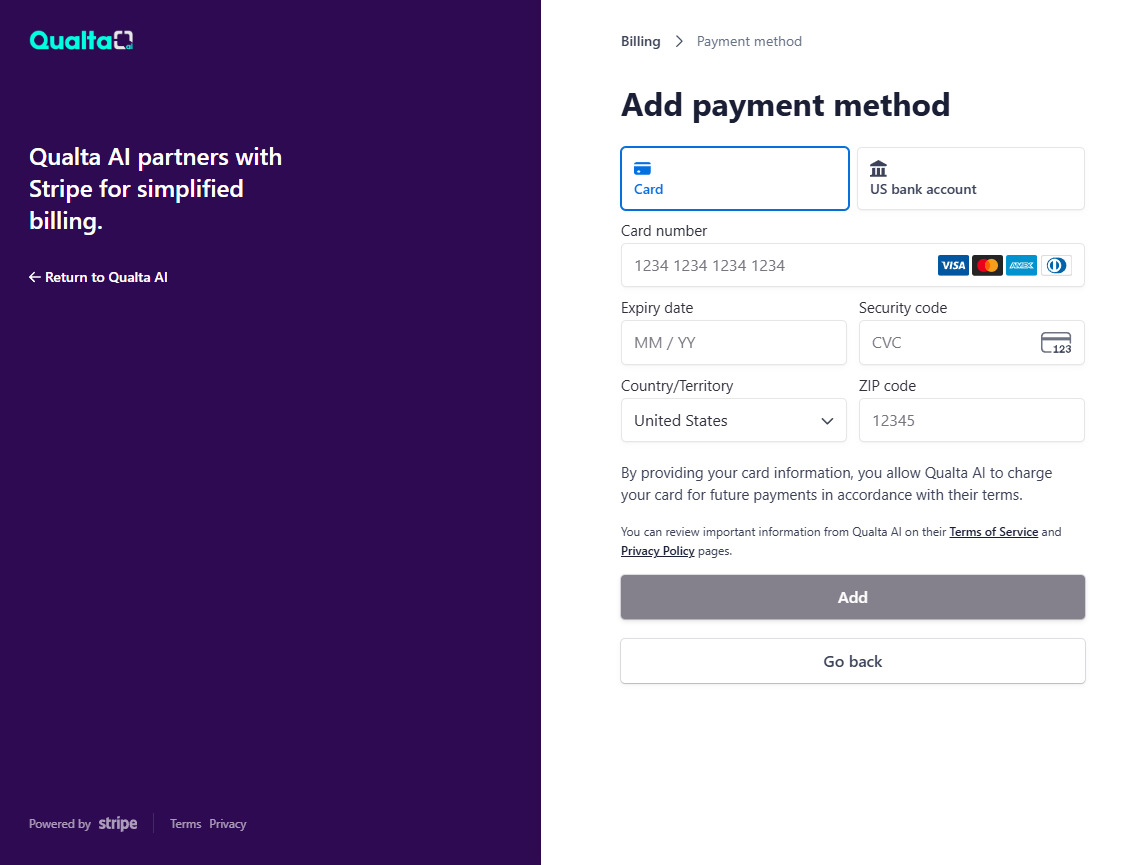
Google Pay and Apple Pay may be available based on your device and geographic location.
Add a Card
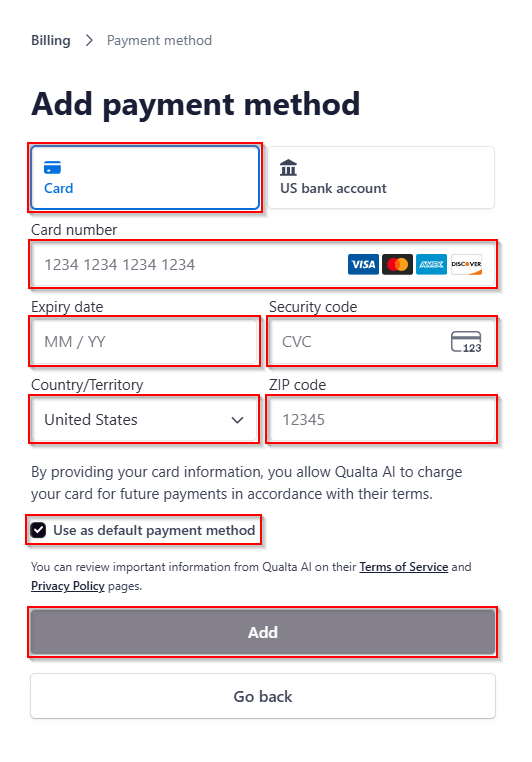
- On the Add payment method page, select the Card button to add a new credit card or Visa debit card.
- In the Card number field, enter the card number.
- In the Expiry date field, enter the expiry date of the card.
- In the Security code field, enter the CVC number of the card.
- From the Country/Territory drop-down menu, select the country where your card's billing address is located.
- In the ZIP code field, enter the postal code associated with your card's billing address.
- To set the newly added card as the default payment method, activate the Use as default payment method checkbox.
- Finally, confirm the accuracy of the card details and select the Add button. (Alternatively, to return to the previous page without adding a payment method, select the Go back button.)
Add a US Bank Account
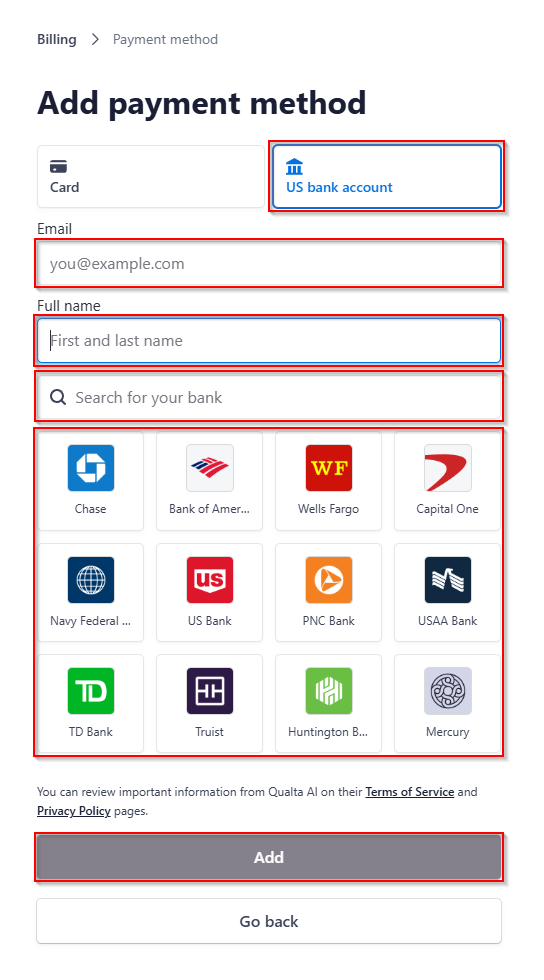
- On the Add payment method page, select the US bank account button to add a new US bank account.
- In the Email field, enter the email address associated with your Qualta AI account or your primary contact email for billing purposes.
- In the Full name field, enter the full name of the bank account holder exactly as it appears on the bank's records for that account.
- In the Search for your bank field, enter the name of your bank to find it and select it. (Alternatively, if your bank is displayed in the quick selection section, simply click on its logo to select it.)
- Next, a pop-up window will appear to guide you through authorizing and connecting to your bank. Follow the on-screen instructions within this window.
- Finally, select Add. (Alternatively, to return to the previous page without adding a payment method, select the Go back button.)
Change Default Payment Method
In the Billing Portal page, under the Payment Methods section, you will find a list of payment methods you have already added.
Non-default payment methods will show a More options button (three horizontal dots icon) next to them, while your designated default payment method will display an X button.
- Select the More options button next to the payment method you would like to use as the default.
- Select Make default.

Delete Payment Method
Non-default payment methods will show a More options button (three horizontal dots icon) next to them, while your designated default payment method will display an X button.
Delete a Non-Default Payment Method
In the Billing Portal page, under the Payment Methods section, you will find a list of payment methods you have already added.
To delete a non-default payment method, click the More options button (three horizontal dots icon) next to it, then select Delete.

In the Delete payment method pop-up window, select Delete payment method to confirm.

Delete the Default Payment Method
In the Billing Portal page, under the Payment Methods section, you will find a list of payment methods you have already added.
To remove your default payment method while on an active plan, you must first designate a different payment method as the new default.
If you don't have an active plan, simply click the X button next to the default payment method to delete it.

In the Delete payment method pop-up window, select Delete payment method to confirm.
Update Billing Information
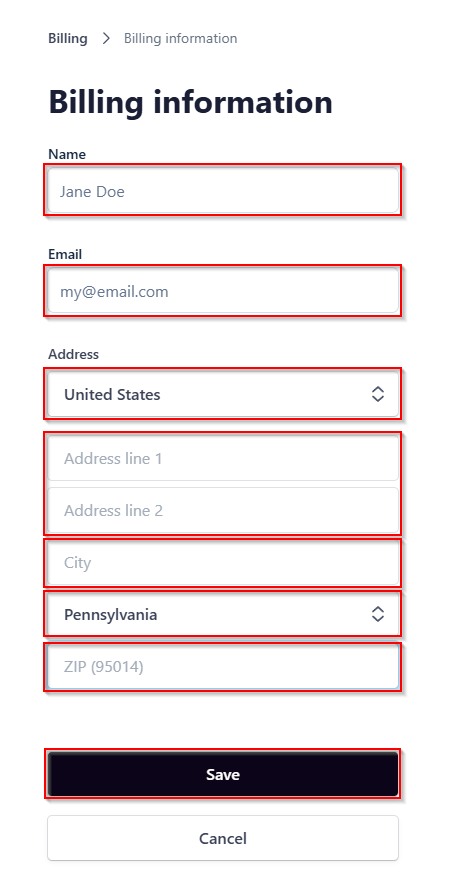
In the Billing Portal page, under the Billing Information section, select the Update information button.
This will take you to the Billing information page.

In the Billing information page:
- In the Name field, enter the full legal name of your company or the individual responsible for the billing.
- In the Email field, enter the email address for billing communications and invoices.
- From the Country dropdown menu, select the country associated with your billing address.
- Provide your complete Street address across the Address line 1 and the optional Address line 2 fields.
- In the City field, enter the name of the city for your billing address.
- From the State dropdown menu, select the state or province for your billing address.
- In the Postal code field, enter the correct postal code (or ZIP Code) for your billing address.
- Once you have entered or updated all your billing details, select the Save button to apply the changes. (Alternatively, select the Cancel button if you wish to discard any changes you've made and return to the previous view without saving.)
Access Invoice History
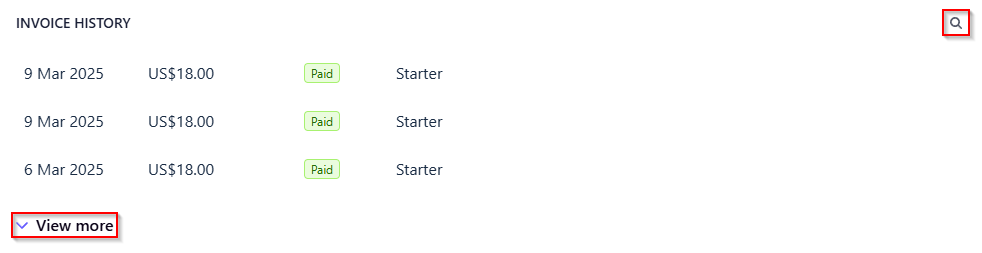
In the Billing Portal page, in the Invoice History section, you will find a comprehensive chronological list of all past invoices generated for your Vamp account.
- To view older invoices that are not immediately visible, select the View more option at the bottom of the list.
- Alternatively, select the Search icon (magnifying glass symbol) at the top right to find specific invoices.
You can search your invoice history by filtering results by Amount, Status (e.g., Paid, Due), or Subscription Plan (e.g., Starter, Pro).
Download Invoice
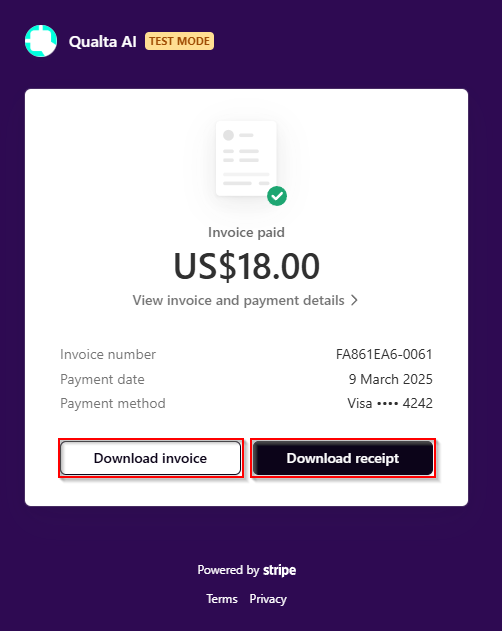
- To view the full details of a specific invoice and access its download options, click on the desired invoice entry within the Invoice History list.
- This will open a new page displaying the invoice summary, payment details, and the Download invoice and Download receipt buttons.
- Select the Download invoice button to save a PDF copy of your invoice.
- Select the Download receipt button to save a PDF copy of your payment receipt.
Update Subscription
You can either upgrade from the free plan to a paid plan or change your existing paid subscription to a different plan.
Upgrade to Paid Plan
If you are currently on the free plan and want to upgrade to a paid plan, first navigate to the Plans page in the navigation menu.
The Plans page is only visible to users on the free plan and disappears once a paid subscription is activated.
- Click the Monthly/Annually toggle button to view the Starter, Pro, and Enterprise subscription plans on a monthly or yearly basis.
- Scroll down to review the available plans and their features.
- Once you have decided, click the Select Plan button for your preferred subscription plan.
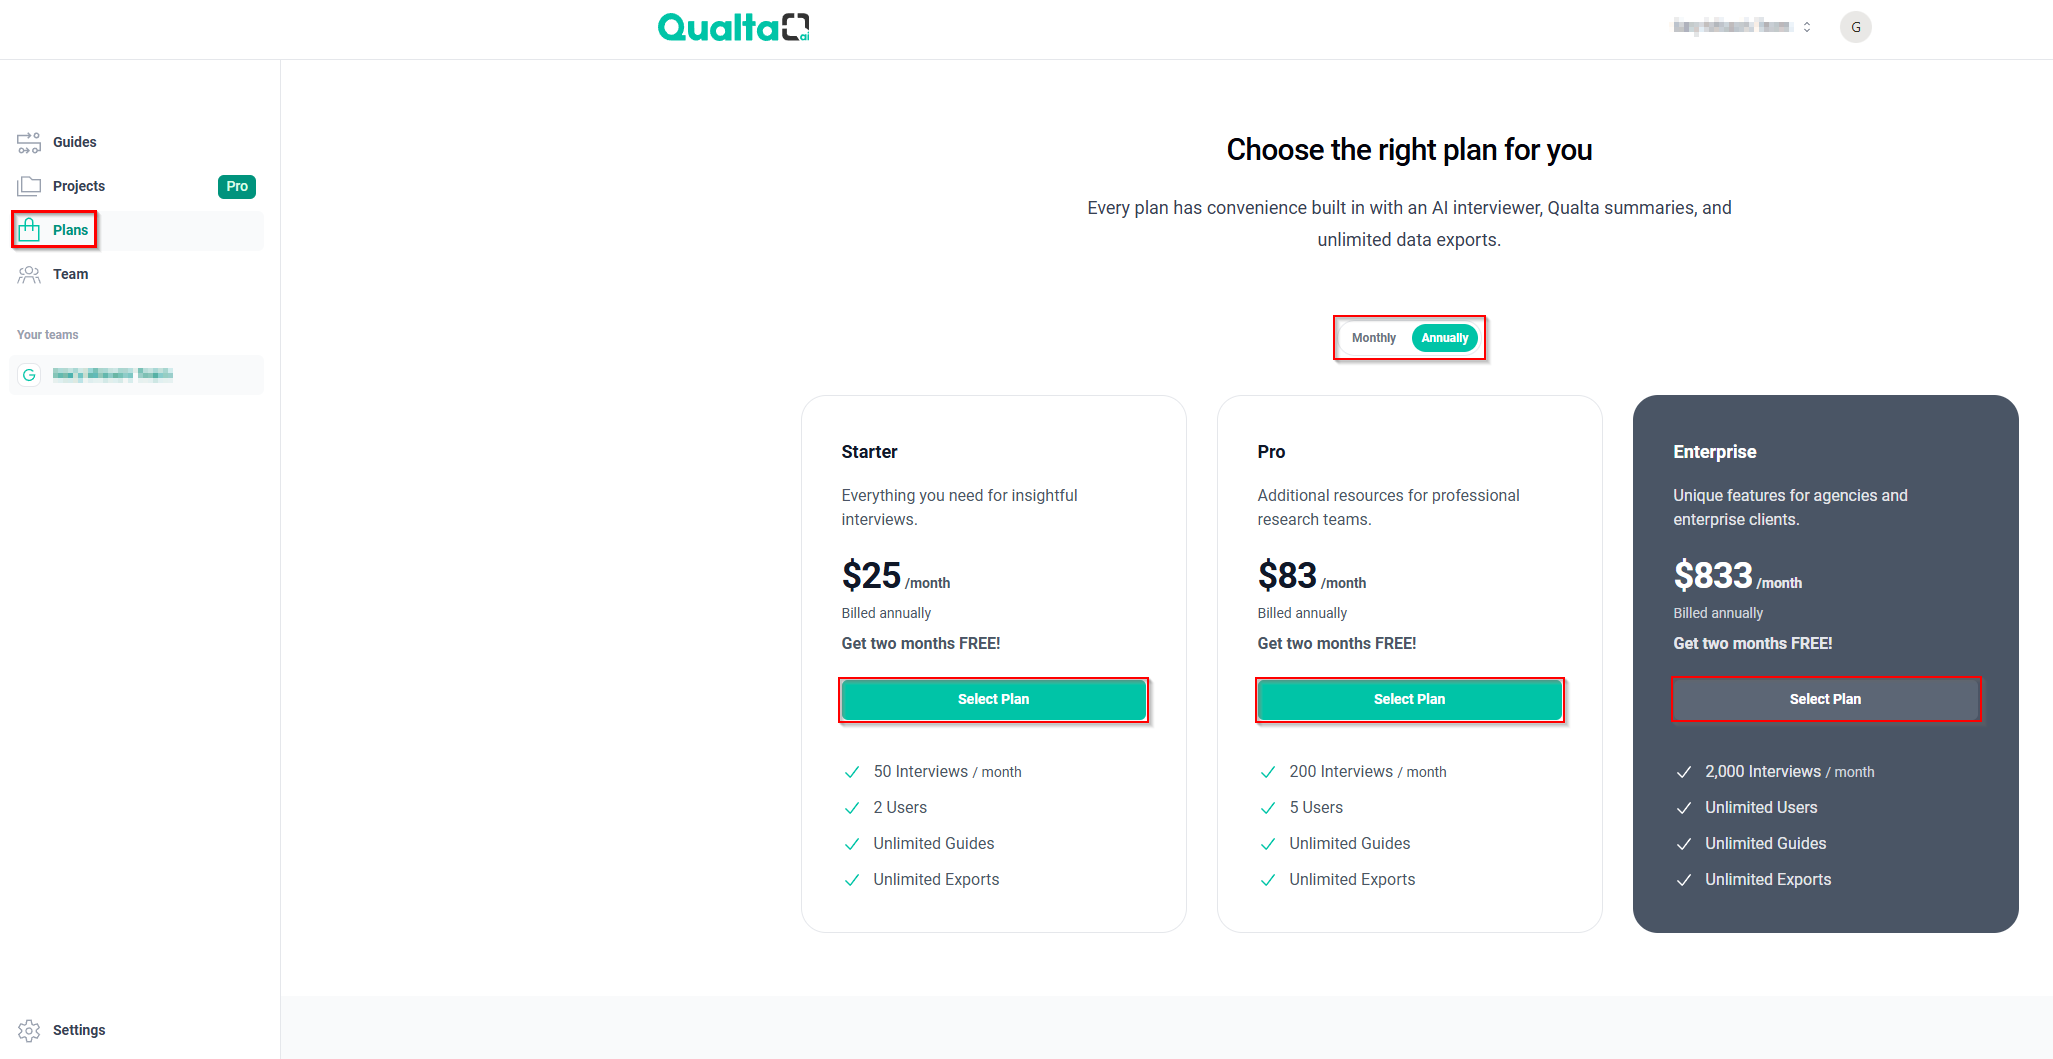
- This will take you to the Stripe Checkout page. Choose your preferred payment method, follow the on-screen instructions, and select Subscribe.
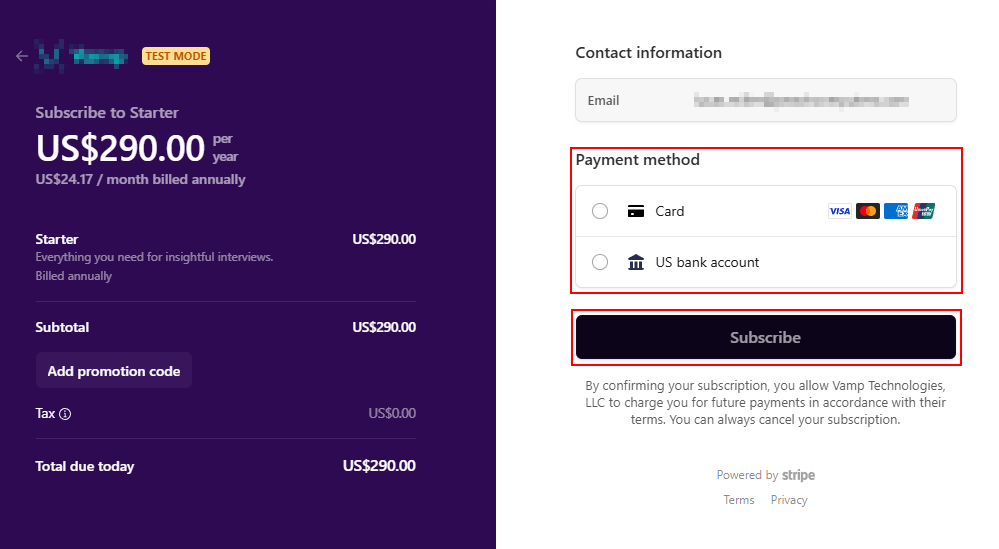
The screenshots displayed here are for informational purposes only and may not reflect current pricing.
Change Paid Plan Tier
If you are already subscribed to a paid plan and want to change your plan tier, at the top of the Billing Portal page, you will find the Current Subscription section.
- Select Update Subscription.

This will take you to the Update your subscription page.
- Here, select the Monthly or Yearly button to view the subscription plans on a monthly or yearly basis.
- Then, click the Select button on the new subscription plan of your choice.
- Select Continue.

This will take you to the Confirm your updates page.
- Here, select Confirm to proceed. (Alternatively, select Go back to discard changes.)

The screenshots displayed here are for informational purposes only and may not reflect current pricing.
Cancel Subscription
At the top of the Billing Portal page, you will find the Current Subscription section.
- Select Cancel subscription.

This will take you to the Cancel your subscription page.
- Here, select Cancel subscription to proceed. (Alternatively, select Go back to discard changes.)

The screenshots displayed here are for informational purposes only and may not reflect current pricing.